
Hiring a Shopify Plus development company is a different exercise than hiring a standard Shopify developer. The platform, the project scope, and the stakes are all larger. A bad hire at the Plus level means six-figure mistakes, missed launch windows, and technical debt that slows down growth for years.
This guide covers what Shopify Plus development companies actually do, how to tell them apart from generalist Shopify shops, and the specific criteria you should use to vet candidates before signing anything.
Shopify Plus is Shopify's enterprise commerce tier, built for high-volume merchants who have outgrown the standard plan's feature set. The platform unlocks capabilities that require specialized development knowledge to implement correctly.
A qualified Shopify Plus development company handles work that standard Shopify developers typically cannot:
Custom checkout development. Shopify Plus grants direct access to checkout customization through Checkout UI Extensions and Shopify Functions -- the platform's system for running custom backend logic during checkout. This enables custom discount logic, tiered pricing rules, conditional shipping options, and cart validation that executes server-side at scale. Standard Shopify merchants cannot modify checkout beyond basic settings.
Shopify Functions implementation. Functions replace the older Script Editor and allow developers to write custom logic for discounts, delivery, payment methods, and cart transformations. The code runs within Shopify's infrastructure (compiled to WebAssembly), which means it's fast, scalable, and doesn't require a separate server. Building and deploying Functions correctly requires backend development experience most theme-focused agencies don't have.
B2B commerce builds. Shopify Plus includes a native B2B feature set: company accounts, customer-specific pricing catalogs, net payment terms (Net 30/60/90), purchase order support, and wholesale portals. Implementing these correctly -- with the right account hierarchy, pricing logic, and checkout flow -- is a distinct discipline from DTC store development.
Shopify Flow and Launchpad. Flow is Plus's automation engine for tagging customers, triggering loyalty actions, managing inventory alerts, and routing orders. Launchpad allows merchants to schedule and automate flash sales, product launches, and promotional events. Agencies that know Plus well have used both tools in production, not just in demo environments.
Multi-store architecture. Shopify Plus includes up to nine expansion stores. For brands operating across multiple regions, currencies, or distinct market segments, structuring these stores correctly -- shared product catalog vs. market-specific, unified reporting, cross-store analytics -- requires experience that only comes from having done it before.
ERP and third-party integrations. Plus merchants typically run more complex operational stacks: ERPs, 3PLs, custom inventory systems, loyalty platforms, and subscription engines. Plus-focused development companies have integration patterns established for these systems rather than building from scratch each time.
The distinction matters because the platforms diverge significantly at the API and architecture level. A developer who builds excellent standard Shopify stores may have never touched Checkout UI Extensions, deployed a Function, or configured a B2B company account.
For a deeper look at how Shopify developer types compare, the guide to hiring Shopify developers covers freelancer vs. agency tradeoffs and how to structure a vetting process by project type.
The short version: if your project involves custom checkout behavior, B2B functionality, Shopify Functions, or multi-store management, you need a developer or agency with Plus-specific experience -- not just Shopify experience in general.
Revenue thresholds are one signal, but not the only one. Shopify Plus starts at $2,300/month (3-year term) or $2,500/month (1-year term), and at high GMV volumes the pricing shifts to a revenue-based model. Most merchants find Plus financially justified around $500,000-$800,000/month in sales.
But revenue isn't always the trigger for needing Plus development expertise. Complexity indicators that matter more:
If any of these apply, a generalist Shopify agency is the wrong starting point regardless of where your revenue sits. On the comparison between Shopify and competing platforms, the post on Shopify vs. WooCommerce and BigCommerce covers the architectural tradeoffs that affect which development path makes sense.
Shopify's partner program has tiered levels: Registered, Select, Plus, Premier, and Platinum. An agency carrying the Plus or higher designation has been reviewed by Shopify and has a documented track record of successful Plus merchant launches. You can verify status through the Shopify Partner directory.
Partner status is a baseline requirement, not a differentiator. You want to see it, but it doesn't tell you whether the agency is a good fit for your specific project type.
Ask for URLs to live stores the agency has built on Shopify Plus -- not mockups, not Figma designs, not case study PDFs without links. Then actually visit those stores and test them.
What to look for in a live portfolio review:
Strong Plus agencies have structured processes for discovery, technical architecture, QA, and launch. Weak ones start writing code based on a brief.
Questions that reveal process quality:
Vague answers to these questions are a red flag. Agencies with experience have clear answers because they've solved these problems before.
Ask direct technical questions during the vetting process:
An agency that gives you confident, specific answers with real examples has the depth. An agency that speaks in generalities is telling you something important.
Ask for two or three reference merchants at similar revenue and complexity levels to your project. The right references are merchants who went through a project similar to yours -- not the agency's flagship showcase client if you're a mid-market brand.
Cost ranges for Plus development work vary significantly based on scope, but common project benchmarks:
Hourly rates for Plus-specialized agencies typically run $90-$175/hour in the US. Offshore agencies may be cheaper, but Plus-specific expertise is less common outside of established agency ecosystems, and the risk of misaligned expectations increases significantly.
These cost ranges assume you already have a Shopify Plus license. For context on broader Shopify development service structures and pricing models, the guide to Shopify development services covers how agencies price their work and what's included in different engagement types.
No live Plus portfolio. If an agency cannot show you live Shopify Plus stores they've built, they don't have relevant experience. Case studies without working URLs are a common substitute -- push for actual sites.
Generalist positioning. Agencies that claim expertise in Shopify, WooCommerce, Magento, and BigCommerce simultaneously are unlikely to have deep Plus specialization. Plus development is distinct enough that real expertise is usually focused.
No discovery process. An agency that gives you a fixed-price quote based on a brief without a dedicated scoping phase is either very experienced with highly standardized projects (unlikely at Plus level) or cutting corners on architecture.
Checkout customization via third-party apps only. Legitimate Plus developers use Checkout UI Extensions and Shopify Functions for checkout customization. If an agency's answer to checkout questions is always "there's an app for that," they're not building at the Plus level.
No post-launch support plan. Plus stores require ongoing maintenance: Shopify platform updates, Function compatibility, app conflicts, and performance monitoring. An agency with no post-launch offering is handing you a store without a safety net.
Unrealistically low quotes. A full Plus build quoted at $8,000 is not a deal -- it's a scope that doesn't match what Plus development actually requires. Low quotes at this level are either a bait-and-switch or a sign the agency doesn't understand what they're building.
After portfolio review, reference checks, and technical vetting, the shortlist usually comes down to fit: does the agency understand your business model, your operational complexity, and your growth trajectory? The best Shopify Plus development company for your project is the one that has solved your specific problems before -- not the one with the most impressive general credentials.
For brands focused on scaling ecommerce revenue alongside the development investment, the guide to ecommerce growth strategy covers the operational and marketing levers that compound with a well-built Plus store.
EmberTribe works with growth-stage ecommerce brands on the marketing strategy side of Plus builds -- if you're evaluating development partners, we're happy to share what we've seen work across our client base.
-----------2022-05-06---15.30.35.png" seoTitle: "What to Do When Your Instagram Ad Account Is Not Found" seoDescription: "Instagram Ad Account Missing? Don't Panic! Here's How to Fix It Fast." ---

When you encounter the error message indicating that your Instagram ad account is not found, it's essential to understand the possible reasons behind this inconvenience.
Having an Instagram ad account is crucial for businesses and individuals looking to promote their products or services on the platform and engaging with its customers. However, sometimes you may come across situations where your ad account seems to have disappeared. In such cases, we must investigate the matter further to determine the cause and find a solution.
There are several potential reasons why your Instagram ad account may disappear. Understanding these reasons can help you troubleshoot the issue more effectively. Here are a few common causes:
When your Instagram ad account is not found, you might encounter different error messages, each indicating a specific issue. Understanding these error messages can provide insights into the nature of the problem. Here are a few common error messages and their meanings:
Dealing with an Instagram ad account not found issue can be frustrating, but understanding the possible reasons and error messages can help you navigate through the problem more effectively. Remember to review your account settings, ensure compliance with Instagram's advertising policies, and report any technical issues to Instagram's support team for prompt resolution.
When faced with a missing Instagram ad account, there are a few initial steps you should take to assess and address the situation.
The first step is to verify the current status of your Instagram ad account. Check whether your account is still active or if it has been suspended or disabled for any reason.
Next, it's important to ensure that your account information is accurate and up to date. Make sure that your email address, contact information, and payment details associated with the account are correct.
If you are unable to address the issue on your own, reaching out to Instagram support can provide you with the necessary guidance and assistance to resolve the problem.
Instagram support is a dedicated team of professionals who are well-equipped to handle various user concerns. Whether you are experiencing login issues, encountering errors, or facing any other technical difficulties, reaching out to Instagram support can be the key to finding a solution.
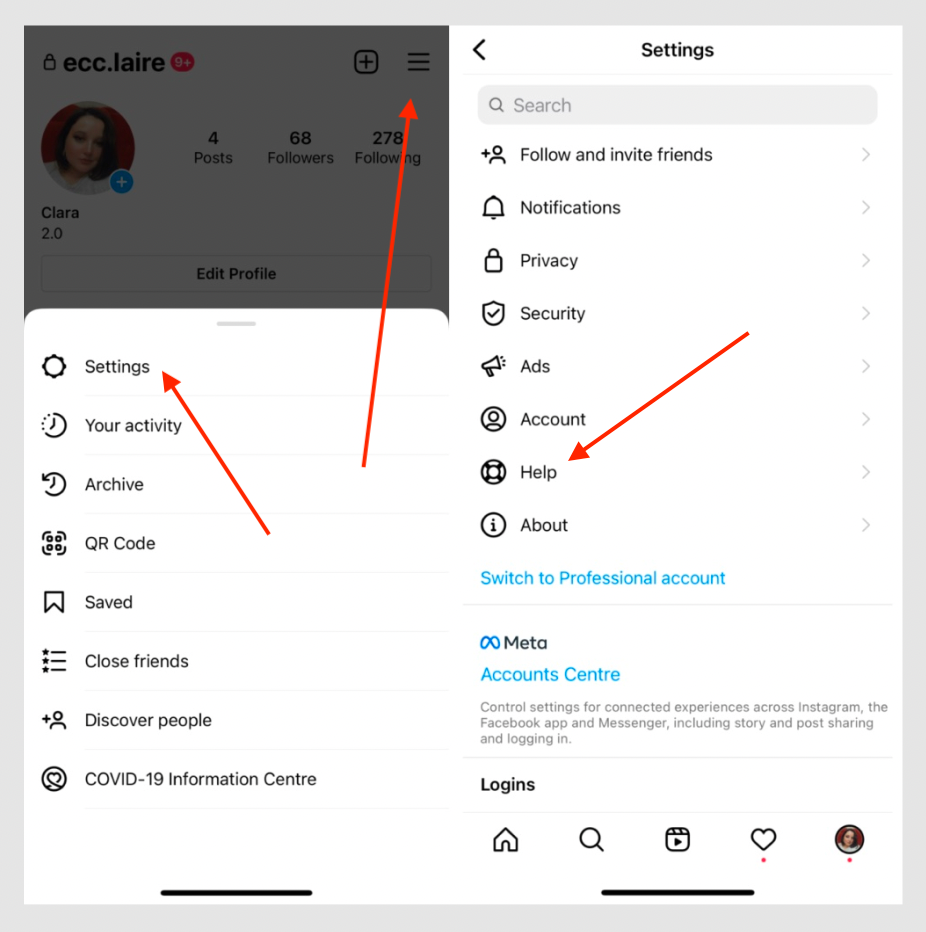
You can contact Instagram support through their Help Center or by using the "Report a Problem" feature within the Instagram app. Accessing the Help Center will provide you with access to Frequently Asked Questions (FAQs) and troubleshooting guides.

The Help Center, as indicated above, is a comprehensive resource that covers a wide range of topics related to Instagram. From account security to privacy settings, you can find detailed information and step-by-step instructions to resolve common issues. It is a valuable tool that empowers users to troubleshoot problems independently.
If you are unable to find a solution through the Help Center, you can directly contact Instagram support by using the "Report a Problem" feature within the app. This feature allows you to submit a detailed description of the issue you are facing, providing Instagram support with the necessary information to assist you effectively.
When contacting Instagram support, it's important to provide them with relevant information to help them understand your issue better. Include details such as your account username, the error message you are seeing, and any steps you have taken to address the problem.
By providing accurate and detailed information, you increase the chances of receiving a prompt and accurate response from Instagram support. It allows them to assess the situation thoroughly and provide you with tailored guidance to resolve the issue.
Additionally, if you have encountered any error messages or unusual behavior on the app, make sure to include them in your communication with Instagram support. These details can provide valuable insights into the root cause of the problem and help the support team identify any ongoing technical issues.
Remember, Instagram support is there to assist you, so don't hesitate to reach out if you need help. They are committed to ensuring a seamless user experience and will work diligently to resolve any issues you may encounter.
While dealing with a missing ad account can be challenging, taking preventive measures can help you avoid similar issues in the future.
Here are a few preventive measures you should consider:
Ensure that you regularly review and update your account information, including your contact details and payment information. This will help maintain the accuracy and validity of your account.
By regularly updating your account information, you can ensure that any changes to your contact details or payment information are accurately reflected. This will help prevent any potential issues that may arise from outdated or incorrect information. Additionally, keeping your account information up to date will make it easier for Instagram or any other platform to reach out to you if there are any concerns or updates regarding your account.
Adhere to Instagram's advertising policies to prevent violations that could lead to your ad account being suspended or disabled. Familiarize yourself with these policies and ensure compliance with them at all times.
Instagram's advertising policies are designed to maintain a safe and positive experience for users. By familiarizing yourself with these policies, you can ensure that your ads meet the platform's guidelines and avoid any potential violations. This includes understanding the rules regarding prohibited content, targeting restrictions, and disclosure requirements. Staying informed about any updates or changes to these policies is also crucial to maintaining compliance.
Additionally, it is important to regularly review your ad campaigns to ensure they are aligned with Instagram's policies. This includes monitoring the content, targeting options, and engagement metrics to identify any potential issues or areas for improvement. By proactively addressing any concerns, you can prevent your ad account from being suspended or disabled, thus avoiding future issues.
Once you have identified the issue and contacted Instagram support, you may need to navigate the reinstatement process to regain access to your missing ad account.
When it comes to reinstating your ad account on Instagram, there are a few important steps to keep in mind. It's crucial to follow these steps closely to ensure a smooth and successful reinstatement process.
The first step in the reinstatement process is to reach out to Instagram support. They will guide you through the necessary steps to regain access to your missing ad account. It's important to provide them with all the relevant information and details about your account.
Once you have contacted Instagram support, they may require additional information or documentation to verify the ownership and legitimacy of your account. This could include providing proof of identity, proof of ownership, or any other documents that can support your case.
After submitting the required information, it's crucial to be patient. The reinstatement process may take some time as Instagram support reviews your case and makes a decision. During this waiting period, it's essential to be prepared for potential requests for further information or clarification.

During the reinstatement process, it's important to manage your expectations. While you may be eager to regain access to your ad account, it's crucial to understand that the process may take some time and patience.
Instagram support will carefully review your case and assess the information and documentation you have provided. They will consider factors such as the nature of the issue, the legitimacy of your account, and any previous violations or warnings.
It's important to note that every case is unique, and the reinstatement process may vary depending on the specific circumstances. Instagram support will communicate with you throughout the process, providing updates and requesting any additional information if necessary.
Remember to check your email regularly during the reinstatement process, as Instagram support may reach out to you for further details or clarification. It's crucial to respond promptly and provide the requested information to expedite the process.
While waiting for the reinstatement decision, it's a good idea to review your account and ensure that you are in compliance with Instagram's policies and guidelines. This includes reviewing your ad content, ensuring it meets the platform's advertising standards, and addressing any potential issues or violations.
You can always leave your social media advertising Sarategy in the hands of the experts, ideally a social media agency. But, by following the instructions provided by Instagram support and being patient throughout the reinstatement process, you increase your chances of successfully managing any problems, like a missing ad account.
Experiencing a missing Instagram ad account can be a frustrating situation. By following the steps outlined above and reaching out to Instagram support for assistance, you can increase your chances of regaining access to your account. Additionally, taking preventive measures and staying compliant with Instagram's advertising policies can help you avoid similar issues in the future. Remember to remain patient and cooperative throughout the process, as reinstating your ad account may take some time.

Instagram Highlights let you pin your best story content to your profile permanently — but most people only know the basic method. In this guide, we cover how to add highlights on Instagram, how to create new ones from scratch, and the workaround that lets you add highlights without posting to your story.

Instagram Highlights are collections of story clips pinned to your profile page, displayed directly below your bio. Unlike regular stories that disappear after 24 hours, Highlights stay visible for as long as you keep them.
Think of them as a virtual storefront. When someone visits your profile, Highlights are the first content they can browse — making them a powerful tool for personal branding and content curation. Each Highlight can be dedicated to a specific theme, product line, or topic, letting you attract like-minded followers or customers who connect with your content.
For businesses, Highlights are especially useful for showcasing testimonials, product demos, FAQs, behind-the-scenes content, and promotions — all without cluttering your main feed.
The standard method for creating Instagram Highlights pulls from your story archive. Here is how to do it:
Your new Highlight will now appear on your profile, right below your bio.
Note: Your stories are automatically saved to your archive by default. If yours aren't showing up, go to Settings > Privacy > Story and make sure "Save story to archive" is turned on.
You can also create a Highlight directly from a story you are currently viewing or have just posted:
This method is great for building Highlights in real time as you post stories throughout the day.
This is the workaround most people don't know about. If you want to add content to your Highlights without it showing up in your live story feed (where your followers would see it for 24 hours), follow these steps:

By using this method, you can keep your story feed clean while still building out your Highlights with the content you want. It is especially useful for businesses that want to add curated content to Highlights without sending notifications or cluttering their followers' story trays.
Pro tip: If the story appears briefly before you delete it, you can also toggle your account to private, post the story, immediately delete it, wait 24 hours, then restore and add to Highlights — then switch back to public. This ensures zero visibility.
Keeping your Highlights fresh and well-organized is important for making a good first impression. Here is how to edit or remove them:
The individual stories inside the Highlight will remain in your archive — only the Highlight collection itself is removed.
Instagram does not offer a built-in reorder feature. However, when you edit a Highlight (even just opening and saving it without changes), it moves to the front of the row. Use this trick to reorder your Highlights by editing them in reverse order of how you want them displayed.
Your Highlight covers are the first thing visitors see. Use custom-designed icons or branded images that clearly represent each category. Consistent cover designs make your profile look polished and professional.
Group your content into clear themes — products, testimonials, tutorials, behind-the-scenes, events. This makes it easier for visitors to find what they are looking for and keeps your profile structured.
Review your Highlights regularly and remove outdated content. A Highlight full of old promotions or expired offers hurts your credibility. Aim to refresh your Highlights at least once per quarter.
Place your most important Highlights first (closest to the left side of your profile). For businesses, this might be a "Start Here" guide, your best testimonials, or your core product showcase. For personal brands, consider leading with your strongest content or most popular series.
Yes. Post the story, delete it immediately, wait 24 hours, restore it from "Recently Deleted," and then add it to a Highlight from your archive. We walk through the full steps above.
Yes. Any photo or video that has been posted as a story and saved to your archive can be added to a Highlight — regardless of when it was originally posted. Just make sure "Save story to archive" is enabled in your settings.
Highlights stay on your profile indefinitely. Unlike stories, they do not expire after 24 hours. You can keep them visible for as long as you want and remove them at any time.
There is no limit to the number of Highlights you can create, and each individual Highlight can hold up to 100 story clips. Once a Highlight reaches 100, the oldest story is removed when a new one is added.
You can see viewer lists for story clips within a Highlight for up to 48 hours after the original story was posted. After that window, viewer data is no longer available — but the content remains in your Highlight.
Instagram Highlights are one of the most underused features on the platform. Whether you are building a brand, growing your Instagram presence, or just want a better-organized profile, taking the time to create and manage your Highlights will pay off every time someone visits your page.