Meta advertising remains the highest-volume paid acquisition channel for DTC brands in 2026. Facebook and Instagram together reach more than 3 billion daily active users, and Triple Whale data shows that brands running performance campaigns still allocate 68% of their total ad budget to Meta. But the playbook that worked in 2022 is obsolete. Two major shifts, a new ranking algorithm called Andromeda and a fundamental redesign of campaign automation through Advantage+, have changed how ads get delivered, which creative wins, and how DTC brands need to structure their accounts.
This guide covers what the platform looks like now, how to structure campaigns that compound, and where brands leave the most performance on the table.
Meta's Andromeda update, announced in December 2024 and fully rolled out by October 2025, is the most significant change to the ad delivery system since Advantage+ campaigns launched in 2022. The shift is conceptual as much as technical: Meta moved from an audience-first model to a creative-first delivery model. The system now matches the most relevant creative to each individual user based on thousands of behavioral signals, rather than showing your ad to everyone in a predefined audience.
The infrastructure behind this shift is substantial. Andromeda enables a 10,000x increase in model complexity and uses NVIDIA Grace Hopper Superchips alongside Meta's own MTIA hardware. Meta's internal testing shows +6% recall improvement and +8% ad quality improvement on selected segments. From a practical standpoint, this means your creative assets are now the primary lever for distribution, not your audience targeting.
What that means for advertisers: broad targeting outperforms narrow targeting because the model needs room to find the best creative-to-user match across a large pool. Tightly constrained audiences limit the algorithm's ability to optimize. Meta now officially recommends minimal audience constraints as default campaign behavior.
Creative diversity requirements also increased significantly. Meta's internal guidance post-Andromeda recommends 8 to 15 distinct creative assets per ad set, with each asset representing a meaningfully different angle, format, or message. The algorithm has similarity detection built in: near-duplicate variations are recognized and deprioritized.
Volume alone does not satisfy the requirement. Brands need genuine creative variety across hooks, formats, and messages to give the algorithm sufficient input for effective distribution.
Understanding where your account stands requires current reference points. US CPM on Meta averaged $23.00 in 2026, against a global median of $13.48. CPMs follow a predictable seasonal pattern: the global median opened at $17.73 in January 2025, peaked at $25.22 in November during Q4, then reset to $15.74 in January 2026 before climbing again. For DTC brands planning budgets, this seasonality means Q4 costs roughly 40% more per impression than Q1.
ROAS benchmarks for ecommerce brands on Meta sit at a median of 1.93x across all categories, but that number is not a target. For a DTC brand to be profitable, a 3x to 4x ROAS is the practical floor, and top performers regularly achieve 8x or higher on well-optimized accounts. Creative quality is now the single biggest driver: 70 to 80% of Meta ad performance is attributed to creative quality, and video ads under 15 seconds outperform longer formats by 31% on click-through rate.
The diagram below compares Advantage+ Shopping and manual campaigns across the metrics that matter most for DTC brands:

The debate over Advantage+ Shopping versus manual campaign structures is more nuanced than most guides acknowledge. Advantage+ Shopping Campaigns (ASC) use AI to automatically test up to 150 creative combinations and reallocate budget dynamically. The aggregate ROAS numbers favor Advantage+: Black Friday 2024 testing showed ASC delivering 3.14x ROAS versus 2.70x for manual campaigns. But ROAS is not the full picture.
Wicked Reports analyzed 55,661 Meta campaigns and found a meaningful divergence in new customer acquisition cost. Advantage+ campaigns saw new customer acquisition cost climb from $257 in May 2024 to $528 in May 2025, more than doubling in twelve months. Manual campaigns held stable or slightly improved over the same period. The implication is that Advantage+ re-converts existing customers at a good ROAS but struggles to acquire net-new buyers cost-effectively, which matters significantly for growth-stage DTC brands where new customer growth is the primary objective.
The practical recommendation based on 2025-2026 data is a hybrid structure: Advantage+ for bottom-of-funnel retargeting, where its creative testing and budget reallocation work best, and manual campaigns for top-of-funnel cold traffic where advertiser-defined audiences control who actually sees the ads. This split gives you the AI efficiency for conversion-ready audiences while preserving cost control on new customer acquisition.
Effective meta advertising strategy for DTC brands in 2026 is built on three pillars: creative system, campaign structure, and measurement discipline.
Creative system. Post-Andromeda, creative velocity is the primary competitive advantage. Brands running 10 to 20 unique creative concepts per campaign outperform brands recycling the same 3 to 5 assets. The key word is "concepts," not variations. Slight copy changes or recolored backgrounds register as near-duplicates and receive limited distribution.
Distinct angles mean different hooks, formats, and messages targeting different awareness stages. Video ads under 15 seconds, with a hook that communicates the offer or problem within the first 2 seconds, consistently outperform longer content on Meta's current algorithm.
Campaign structure. Simplified structures outperform complex ones. Meta now recommends fewer ad sets with more creative per set, letting the algorithm allocate budget within a broad audience rather than spreading spend across many narrow targeting groups. For a DTC brand starting a new campaign, a single Advantage+ ad set with 10 to 15 creatives loaded at launch gives the algorithm the input it needs to find early signals without fractured data.
Measurement discipline. Meta's Aggregated Event Measurement (AEM) was updated in 2025 to remove the 8-event limit and auto-process eligible conversion events. This simplifies setup but raises the stakes on understanding what the model is measuring. Meta's conversion API remains essential for DTC brands running any significant volume: server-side events supplement browser-based tracking and improve signal quality for both optimization and attribution. Accounts with strong CAPI implementation consistently show lower CPAs and faster learning phase exits.
Meta's bidding system gives DTC brands three primary levers: cost per result goal, ROAS goal, and highest volume (no bid cap). For brands with fewer than 50 weekly conversions per ad set, highest volume bidding is the correct starting point. Cost-per-result and ROAS goal bidding require a sufficient conversion volume to function, and constraining the bid before the algorithm has enough data produces underdelivery and poor results.
Advantage+ Audiences, Meta's AI-powered audience tool, is now the recommended setting for most campaigns. It uses a "suggestion" rather than a constraint: you provide seed audience data and the algorithm expands from there. This works better than manual interest stacking for established brands with existing pixel data. For brands newer to the platform, a broad open targeting approach with Advantage+ Audiences enabled is a better starting point than narrow interest targeting, which the algorithm will override anyway as it learns.
Budget scaling follows a 20% weekly increment rule as a ceiling, not a floor. Scaling faster than that resets the learning phase and can cause delivery instability. For DTC brands running Advantage+ Shopping, budget can often be scaled more aggressively because the campaign type is designed for stability at higher spend levels, but the principle of gradual testing still applies when moving into new creative strategies or audience territory.
Creative quality determines performance more than any structural or bidding decision. The benchmarks are clear: hook rate above 30% on ecommerce video ads and video length under 15 seconds are the two variables most correlated with strong CTR and downstream conversions. Understanding what makes a good ad is the foundation before any of the campaign mechanics matter.
The formats performing best for DTC brands right now include: lo-fi UGC video with a clear problem-solution structure, static image ads with bold typography and one primary value claim, and carousel formats showing product benefits rather than product photos. The common thread is specificity. Generic brand awareness creative performs poorly on Meta's current algorithm because it generates low engagement signals, which the model interprets as poor creative quality and limits distribution.
For ecommerce digital marketing more broadly, Meta is one piece of a larger acquisition system. The brands that get the most from their Meta spend typically run it in coordination with strong email and SMS retention programs, because the repeat purchase revenue that comes from retained customers is what makes the blended economics of Meta acquisition work at scale.
For brands spending above $30,000 per month on Meta, the complexity of managing Advantage+, Andromeda-optimized creative systems, AEM configuration, and incrementality measurement justifies a dedicated partner. A paid social media agency that specializes in Meta can compress the learning curve significantly and bring test-and-learn infrastructure that most in-house teams can't build from scratch.
The signal to look for in a Meta partner is not a ROAS case study. It's their creative operation: how many unique concepts they produce per month, how they test and kill underperformers, and whether they understand the difference between in-platform ROAS and incrementally attributable revenue. Those questions reveal whether an agency is operating at the level the platform currently requires.
If you're evaluating Meta advertising as a growth channel or looking to rebuild a stalled account, a Facebook ads agency with DTC-specific experience is the most direct path to getting the structural and creative foundations right.
EmberTribe runs paid social programs for growth-stage DTC brands, with a specific focus on Meta advertising systems built for scale. If your current account isn't generating the returns your product margin supports, talk to our team at embertribe.com.

Meta advertising remains the highest-volume paid acquisition channel for DTC brands in 2026. Facebook and Instagram together reach more than 3 billion daily active users, and Triple Whale data shows that brands running performance campaigns still allocate 68% of their total ad budget to Meta. But the playbook that worked in 2022 is obsolete. Two major shifts, a new ranking algorithm called Andromeda and a fundamental redesign of campaign automation through Advantage+, have changed how ads get delivered, which creative wins, and how DTC brands need to structure their accounts.
This guide covers what the platform looks like now, how to structure campaigns that compound, and where brands leave the most performance on the table.
Meta's Andromeda update, announced in December 2024 and fully rolled out by October 2025, is the most significant change to the ad delivery system since Advantage+ campaigns launched in 2022. The shift is conceptual as much as technical: Meta moved from an audience-first model to a creative-first delivery model. The system now matches the most relevant creative to each individual user based on thousands of behavioral signals, rather than showing your ad to everyone in a predefined audience.
The infrastructure behind this shift is substantial. Andromeda enables a 10,000x increase in model complexity and uses NVIDIA Grace Hopper Superchips alongside Meta's own MTIA hardware. Meta's internal testing shows +6% recall improvement and +8% ad quality improvement on selected segments. From a practical standpoint, this means your creative assets are now the primary lever for distribution, not your audience targeting.
What that means for advertisers: broad targeting outperforms narrow targeting because the model needs room to find the best creative-to-user match across a large pool. Tightly constrained audiences limit the algorithm's ability to optimize. Meta now officially recommends minimal audience constraints as default campaign behavior.
Creative diversity requirements also increased significantly. Meta's internal guidance post-Andromeda recommends 8 to 15 distinct creative assets per ad set, with each asset representing a meaningfully different angle, format, or message. The algorithm has similarity detection built in: near-duplicate variations are recognized and deprioritized.
Volume alone does not satisfy the requirement. Brands need genuine creative variety across hooks, formats, and messages to give the algorithm sufficient input for effective distribution.
Understanding where your account stands requires current reference points. US CPM on Meta averaged $23.00 in 2026, against a global median of $13.48. CPMs follow a predictable seasonal pattern: the global median opened at $17.73 in January 2025, peaked at $25.22 in November during Q4, then reset to $15.74 in January 2026 before climbing again. For DTC brands planning budgets, this seasonality means Q4 costs roughly 40% more per impression than Q1.
ROAS benchmarks for ecommerce brands on Meta sit at a median of 1.93x across all categories, but that number is not a target. For a DTC brand to be profitable, a 3x to 4x ROAS is the practical floor, and top performers regularly achieve 8x or higher on well-optimized accounts. Creative quality is now the single biggest driver: 70 to 80% of Meta ad performance is attributed to creative quality, and video ads under 15 seconds outperform longer formats by 31% on click-through rate.
The diagram below compares Advantage+ Shopping and manual campaigns across the metrics that matter most for DTC brands:
The debate over Advantage+ Shopping versus manual campaign structures is more nuanced than most guides acknowledge. Advantage+ Shopping Campaigns (ASC) use AI to automatically test up to 150 creative combinations and reallocate budget dynamically. The aggregate ROAS numbers favor Advantage+: Black Friday 2024 testing showed ASC delivering 3.14x ROAS versus 2.70x for manual campaigns. But ROAS is not the full picture.
Wicked Reports analyzed 55,661 Meta campaigns and found a meaningful divergence in new customer acquisition cost. Advantage+ campaigns saw new customer acquisition cost climb from $257 in May 2024 to $528 in May 2025, more than doubling in twelve months. Manual campaigns held stable or slightly improved over the same period. The implication is that Advantage+ re-converts existing customers at a good ROAS but struggles to acquire net-new buyers cost-effectively, which matters significantly for growth-stage DTC brands where new customer growth is the primary objective.
The practical recommendation based on 2025-2026 data is a hybrid structure: Advantage+ for bottom-of-funnel retargeting, where its creative testing and budget reallocation work best, and manual campaigns for top-of-funnel cold traffic where advertiser-defined audiences control who actually sees the ads. This split gives you the AI efficiency for conversion-ready audiences while preserving cost control on new customer acquisition.
Effective meta advertising strategy for DTC brands in 2026 is built on three pillars: creative system, campaign structure, and measurement discipline.
Creative system. Post-Andromeda, creative velocity is the primary competitive advantage. Brands running 10 to 20 unique creative concepts per campaign outperform brands recycling the same 3 to 5 assets. The key word is "concepts," not variations. Slight copy changes or recolored backgrounds register as near-duplicates and receive limited distribution.
Distinct angles mean different hooks, formats, and messages targeting different awareness stages. Video ads under 15 seconds, with a hook that communicates the offer or problem within the first 2 seconds, consistently outperform longer content on Meta's current algorithm.
Campaign structure. Simplified structures outperform complex ones. Meta now recommends fewer ad sets with more creative per set, letting the algorithm allocate budget within a broad audience rather than spreading spend across many narrow targeting groups. For a DTC brand starting a new campaign, a single Advantage+ ad set with 10 to 15 creatives loaded at launch gives the algorithm the input it needs to find early signals without fractured data.
Measurement discipline. Meta's Aggregated Event Measurement (AEM) was updated in 2025 to remove the 8-event limit and auto-process eligible conversion events. This simplifies setup but raises the stakes on understanding what the model is measuring. Meta's conversion API remains essential for DTC brands running any significant volume: server-side events supplement browser-based tracking and improve signal quality for both optimization and attribution. Accounts with strong CAPI implementation consistently show lower CPAs and faster learning phase exits.
Meta's bidding system gives DTC brands three primary levers: cost per result goal, ROAS goal, and highest volume (no bid cap). For brands with fewer than 50 weekly conversions per ad set, highest volume bidding is the correct starting point. Cost-per-result and ROAS goal bidding require a sufficient conversion volume to function, and constraining the bid before the algorithm has enough data produces underdelivery and poor results.
Advantage+ Audiences, Meta's AI-powered audience tool, is now the recommended setting for most campaigns. It uses a "suggestion" rather than a constraint: you provide seed audience data and the algorithm expands from there. This works better than manual interest stacking for established brands with existing pixel data. For brands newer to the platform, a broad open targeting approach with Advantage+ Audiences enabled is a better starting point than narrow interest targeting, which the algorithm will override anyway as it learns.
Budget scaling follows a 20% weekly increment rule as a ceiling, not a floor. Scaling faster than that resets the learning phase and can cause delivery instability. For DTC brands running Advantage+ Shopping, budget can often be scaled more aggressively because the campaign type is designed for stability at higher spend levels, but the principle of gradual testing still applies when moving into new creative strategies or audience territory.
Creative quality determines performance more than any structural or bidding decision. The benchmarks are clear: hook rate above 30% on ecommerce video ads and video length under 15 seconds are the two variables most correlated with strong CTR and downstream conversions. Understanding what makes a good ad is the foundation before any of the campaign mechanics matter.
The formats performing best for DTC brands right now include: lo-fi UGC video with a clear problem-solution structure, static image ads with bold typography and one primary value claim, and carousel formats showing product benefits rather than product photos. The common thread is specificity. Generic brand awareness creative performs poorly on Meta's current algorithm because it generates low engagement signals, which the model interprets as poor creative quality and limits distribution.
For ecommerce digital marketing more broadly, Meta is one piece of a larger acquisition system. The brands that get the most from their Meta spend typically run it in coordination with strong email and SMS retention programs, because the repeat purchase revenue that comes from retained customers is what makes the blended economics of Meta acquisition work at scale.
For brands spending above $30,000 per month on Meta, the complexity of managing Advantage+, Andromeda-optimized creative systems, AEM configuration, and incrementality measurement justifies a dedicated partner. A paid social media agency that specializes in Meta can compress the learning curve significantly and bring test-and-learn infrastructure that most in-house teams can't build from scratch.
The signal to look for in a Meta partner is not a ROAS case study. It's their creative operation: how many unique concepts they produce per month, how they test and kill underperformers, and whether they understand the difference between in-platform ROAS and incrementally attributable revenue. Those questions reveal whether an agency is operating at the level the platform currently requires.
If you're evaluating Meta advertising as a growth channel or looking to rebuild a stalled account, a Facebook ads agency with DTC-specific experience is the most direct path to getting the structural and creative foundations right.
EmberTribe runs paid social programs for growth-stage DTC brands, with a specific focus on Meta advertising systems built for scale. If your current account isn't generating the returns your product margin supports, talk to our team at embertribe.com.

Choosing the right Instagram marketing agency in 2026 is one of the highest-leverage decisions a growth-stage brand can make. Instagram now reaches over 2 billion monthly active users, and its ad formats have matured far beyond the simple image post. But with hundreds of agencies claiming Instagram expertise, knowing what separates a genuine performance partner from a vanity metrics shop takes more than a quick Google search.
This guide breaks down what a qualified Instagram advertising agency actually does, the formats they need to master, how they should approach organic versus paid strategy, and the performance benchmarks you should hold them to.
An Instagram marketing agency manages every layer of your brand's presence and advertising on the platform. At the execution level, that means creative strategy, audience targeting, campaign setup, bid management, and ongoing performance optimization. At the strategic level, it means understanding where Instagram fits within your full paid social mix and how it connects to business outcomes — not just platform metrics.
Specifically, a full-service Instagram agency will typically handle:
Agencies that limit their scope to "posting and boosting" are not the same as those managing sophisticated paid campaigns. When evaluating a partner, understanding which of these functions they own versus subcontract is essential.
Instagram's ad inventory in 2026 spans several distinct formats, each suited to a different stage of the funnel. A strong Instagram ads agency knows when to deploy each one and why.
Reels Ads are the current high-reach format on the platform. Meta has aggressively expanded Reels inventory, which keeps CPMs competitive — often 30 to 50 percent lower than Feed placements. Reels ads reach approximately 726 million users and generate about 22 percent higher engagement than Stories. For DTC brands, Reels is where upper-funnel creative needs to win in the first 1.5 seconds or it gets scrolled past.
Stories Ads operate as a mid-funnel engine. The full-screen vertical format creates an immersive environment that works well for narrative sequences and limited-time offers. Stories maintain a 29 percent higher click-through rate than standard Feed placements, making them effective for driving direct response.
Feed Ads (photo and carousel) remain useful for habitual feed scrollers and high-intent retargeting. Carousel formats in particular allow for multi-product showcase or sequential storytelling, which works well for DTC brands with defined product lines.
Shopping Ads integrate directly with a brand's product catalog and allow users to browse and purchase without leaving the app. Over 62 percent of Instagram users report discovering products through ads, and native checkout with AI-personalized Reels has shown roughly 3.1 percent conversion rates compared to 0.9 percent for static link-out ads.
An agency that only pitches one format is not approaching Instagram strategically. The best campaigns use format diversity to move users through the funnel efficiently.
The most effective Instagram social media agencies do not treat organic and paid as separate tracks. They treat organic as the foundation that makes paid more efficient.
A strong organic content presence does several concrete things for paid performance. It builds a warm audience that's more likely to engage with ads. It provides a credibility signal when users click through and see an active, authentic brand profile. And it generates content performance data — engagement rates, saves, shares — that informs which creative angles are worth investing in with budget.
Brands with strong organic foundations typically see 20 to 40 percent better ROI from their paid campaigns. That gap exists because cold audiences respond differently to brands with visible social proof versus brands with sparse profiles.
In practice, the best agencies either manage both channels or coordinate closely with whoever manages organic. They use organic content to test hooks and creative concepts at zero cost before putting budget behind proven performers. This is especially relevant for Reels, where organic and paid content live in the same inventory environment.
If an agency you're evaluating treats paid and organic as entirely separate conversations with no connection between them, that's a signal they're not maximizing efficiency.
The evaluation process for an Instagram growth agency should go well beyond reviewing a portfolio of pretty ads. Here is what actually matters:
Platform-specific case studies. Ask for Instagram-specific results, not broad "paid social" numbers. Request starting metrics, ending metrics, and the attribution model used. Look for performance ranges like "2.5x to 4x ROAS" rather than cherry-picked single-campaign numbers.
Creative strategy depth. The agency should be able to articulate a clear creative testing framework — what they test, how many variations they run, and how they use data to iterate. Agencies that produce creative in bulk without a structured testing process are wasting ad budget on guesswork. EmberTribe's approach to ad creative testing is covered in detail in our post on what we learned after managing $200M in Facebook ad spend.
Transparency in reporting. Monthly performance reports should clearly outline revenue-tied KPIs — ROAS, cost per acquisition, revenue attributed — not just impressions and reach. If an agency leads with vanity metrics, push back.
Pricing model clarity. Most agencies charge either a flat monthly retainer or a percentage of ad spend (typically 10 to 20 percent), with ad spend billed separately. Retainer-based pricing is now the dominant model — roughly 78 percent of agencies use it. Performance-based arrangements are less common but can work for established ecommerce brands with predictable AOV.
Contract flexibility. Avoid signing 12-month agreements without performance milestones. A 90-day evaluation period with defined KPIs is a reasonable starting point that protects both sides.
Walk away from any agency that guarantees follower counts, refuses to share references, cannot explain their attribution model, or has no active presence on their own Instagram account.
For a broader look at how to evaluate paid social partners across platforms, see our guide on finding the right paid social agency for ecommerce.
Performance benchmarks give you a baseline for evaluating whether an Instagram agency is delivering. Here is what the current data shows for well-managed campaigns in 2026:
CPM (Cost Per Thousand Impressions): Feed ads average around $7.68 CPM, Stories around $6.25. Reels CPMs are often 30 to 50 percent lower as Meta continues building out that inventory. Anything significantly above these averages warrants investigation.
CTR (Click-Through Rate): Feed ads typically land between 0.22 and 0.88 percent. Stories run between 0.33 and 0.54 percent. CTR alone is not a performance indicator — it must be read alongside conversion rate and cost per acquisition to have meaning.
ROAS (Return on Ad Spend): Well-optimized Instagram campaigns average around 4.2x ROAS. Campaigns leveraging Meta's Advantage+ AI-optimized delivery see ROAS improvements of 21 to 22 percent over manually managed campaigns. For ecommerce brands, anything below 2x warrants a creative and targeting audit.
Conversion Rate: Instagram's average ad conversion rate sits between 1 and 3 percent. Native checkout experiences using personalized Reels push the upper end of that range. If your agency is sending traffic to a poorly optimized landing page, they may be solving the wrong problem.
Understanding these benchmarks lets you hold an agency accountable to real performance rather than accepting activity reports as results. If an agency cannot tell you their clients' average ROAS by vertical, that is a red flag.
EmberTribe manages Instagram advertising for DTC brands and ecommerce companies where performance is non-negotiable. Our approach is built around three principles: structured creative testing, funnel-stage format matching, and attribution clarity.
We do not treat Instagram as an isolated channel. Every campaign we run is part of a broader paid social strategy that accounts for where Instagram fits relative to Facebook, TikTok, and other acquisition channels. When a brand's Facebook campaigns need a rethink, that informs how we structure Instagram retargeting. When Instagram Reels creative outperforms, we feed those learnings back into the broader creative process.
For brands looking to understand how Facebook and Instagram work together at the campaign level, our analysis of dynamic ads for broad audiences (DABA) covers the mechanics of how Meta's catalog-based campaigns scale across both platforms.
If your Instagram campaigns are generating impressions without revenue, or if you are working with an agency that cannot explain why your ROAS is where it is, EmberTribe offers a free paid social audit. We will review your account structure, creative strategy, and attribution setup and tell you exactly what we see.
Book a free audit with EmberTribe to get a clear picture of what your Instagram advertising is actually worth — and what it could be.
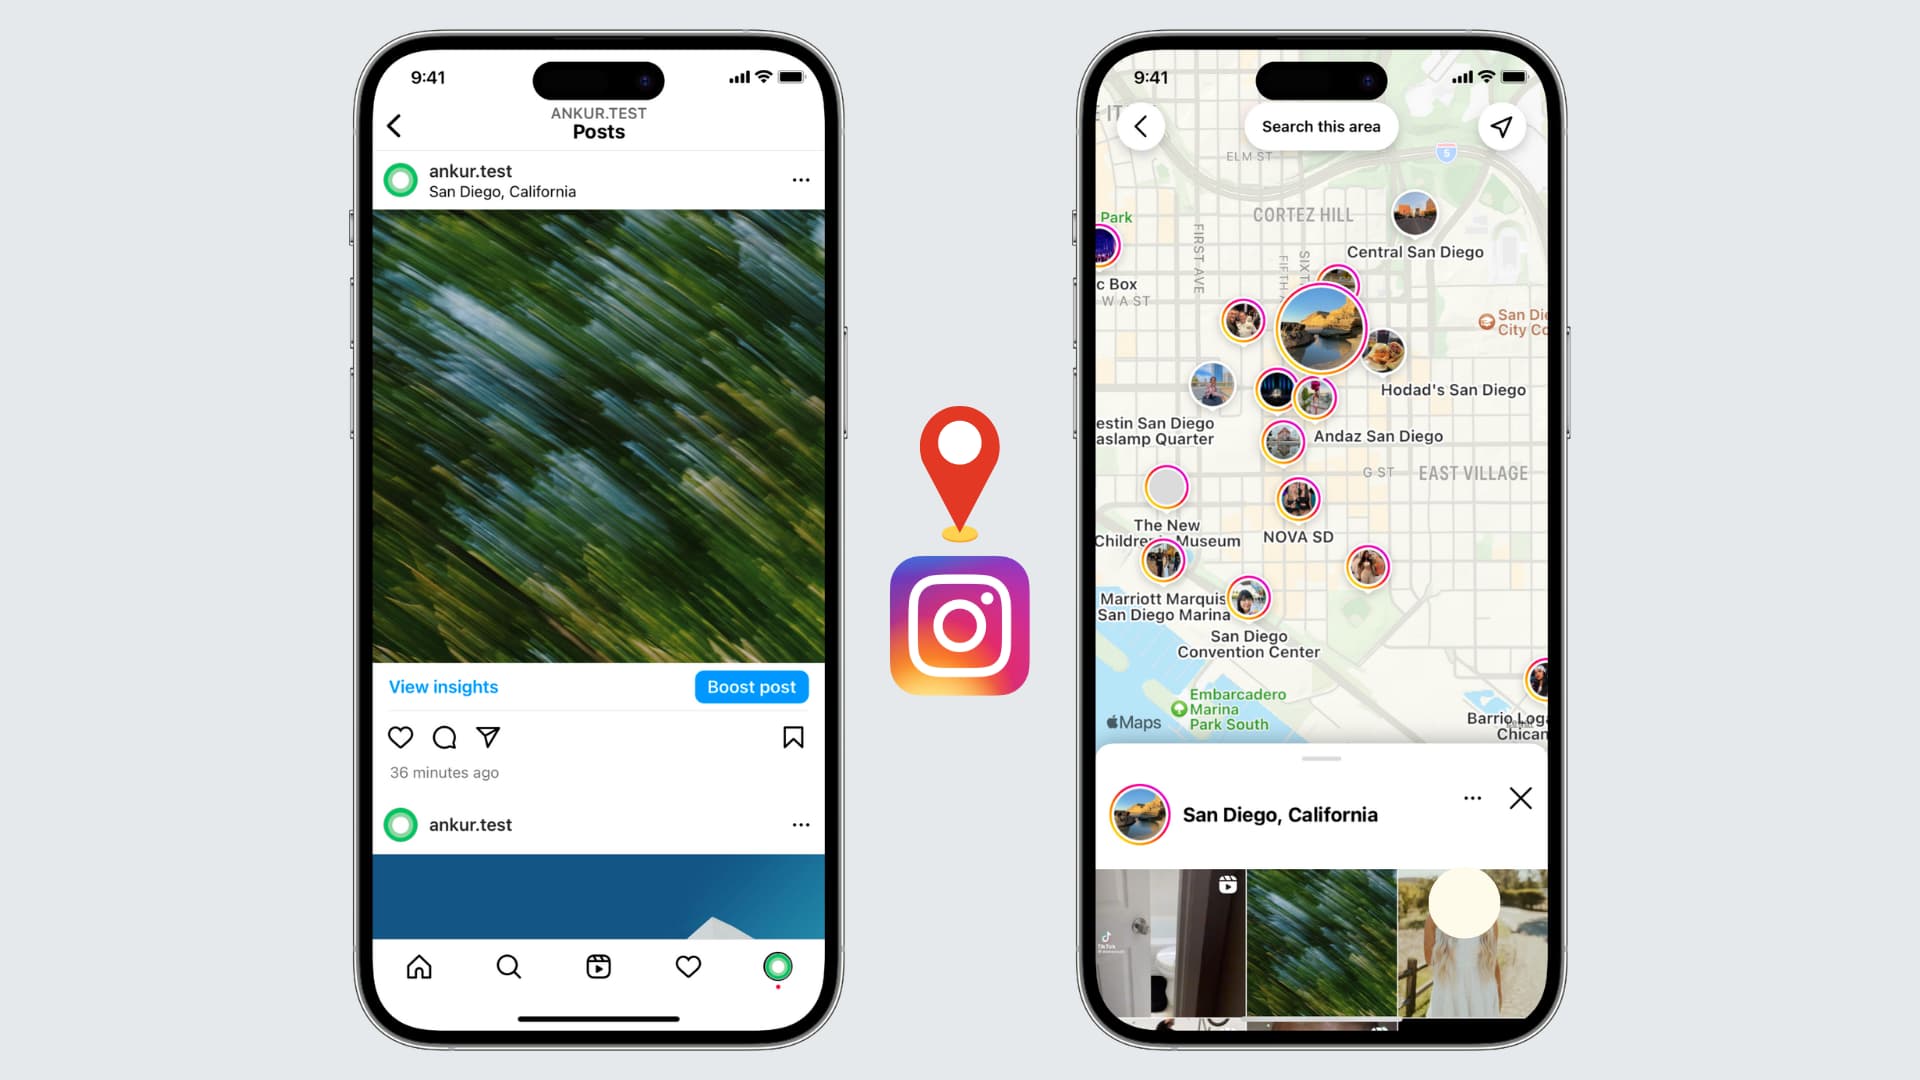
If you're an avid Instagram user looking to enhance your profile and connect with local followers, adding your location to your Instagram bio can be a game-raiser.
Before diving into the steps, it's essential to grasp why location plays a crucial role in your Instagram bio. The social media landscape, especially Instagram, thrives on personal connections and relatability. By including your location, you instantly provide potential followers with valuable information about where you live, work, or frequently visit. This simple piece of information can help foster a sense of trust and authenticity, making it easier to connect with others in your local community.
When you include your location in your Instagram bio, you are not only telling people where you are geographically but also giving them a glimpse into your lifestyle. For example, if you live in a bustling city like New York, your bio might indicate that you are a city dweller who enjoys the vibrant energy and cultural diversity that the city offers. On the other hand, if you live in a small town surrounded by nature, your bio might reflect your love for outdoor activities and a slower-paced lifestyle.
One of the primary benefits of adding your location to your Instagram bio is increased visibility. When users search for specific locations or browse through nearby profiles, having your location readily accessible in your bio gives you a better chance of appearing in those search results. This increased visibility can lead to new followers, collaborations, and even potential business opportunities.
Imagine you are a food blogger based in San Francisco. By including your location in your bio, you make it easier for people searching for food-related content in the city to discover your profile. This can result in more followers who are genuinely interested in your content and may even lead to collaborations with local restaurants or brands.
Location tagging also allows you to tap into the power of local hashtags. When you include your location in your bio, you can use location-specific hashtags in your posts to further boost your visibility. This strategy helps you connect with people who are actively searching for content related to your location, increasing the likelihood of engagement and interaction.
By including your location in your Instagram bio, you make it easier for local followers to find and connect with you. Whether you're looking to meet like-minded individuals, network with professionals in your area, or simply make new friends, adding your location can help attract the right audience. Building a strong local community on Instagram can lead to meaningful relationships both online and offline.
Now that you grasp the significance of adding your location to your Instagram bio, let's dive into the practical steps. Before making any changes, it's important to familiarize yourself with the Instagram app and navigate to your profile. Follow these steps to access your Instagram profile:
To access your Instagram profile, open the Instagram app on your mobile device and log in to your account. Once logged in, tap the profile icon, usually located in the bottom right corner. This will take you to your Instagram profile where all your posts, followers, and bio information are displayed.
Once you're on your Instagram profile, you'll be greeted by a visually appealing grid of your posts. This is where your creativity shines through as you curate a feed that reflects your personality and interests. Take a moment to browse through your posts, reminisce about the memories captured in each image, and appreciate the artistry you've shared with your followers.
Now that you've explored your posts, it's time to focus on your bio. Your Instagram bio is a small but powerful space where you can introduce yourself, showcase your passions, and leave a lasting impression on anyone who visits your profile. To make changes to your bio, navigate to the bio section by tapping the "Edit Profile" button located below your bio description. This will open up the editing options for your bio.
As you enter the bio editing screen, take a moment to reflect on who you are and what message you want to convey to your audience. Your bio should be a reflection of your personality, values, and interests. It's an opportunity to showcase your uniqueness and stand out from the crowd. Consider the tone you want to set, whether it's witty, professional, or heartfelt, and craft your bio accordingly.
Think about what makes you special and what sets you apart from others. Are you an avid traveler, a passionate foodie, or a dedicated fitness enthusiast? Incorporate these aspects into your bio to give people a glimpse into your world.
After you've made the necessary changes to your bio, take a step back and review it with a critical eye. Does it accurately represent who you are? Is it engaging and captivating? Make any final adjustments to ensure that your bio is a true reflection of yourself and leaves a lasting impression on anyone who stumbles upon your profile.
Now that you're in the bio editing section, you're ready to add your location. Simply follow these steps:
Within the bio editing section, locate the text field where your bio description is displayed. You can add your location information by typing it directly into the text field. It's important to be accurate and precise about your location to ensure the information is useful for potential followers.
After entering your location information, make sure to save your updated bio by tapping the "Save" button located in the top right corner of the screen. Once saved, your location will be visible in your Instagram bio, allowing others to easily identify your whereabouts.
Now that you know the steps to add your location to your Instagram bio, let's explore some additional tips to optimize your bio for maximum impact:
Incorporating relevant keywords related to your location can help attract specific audiences. For example, if you're a photographer based in New York City, including keywords like "NYC photographer" or "New York City-based artist" can help you stand out to users searching for those terms.
Hashtags are powerful tools for increasing your visibility on Instagram. Consider including location-specific hashtags in your bio to further connect with users interested in your area. This can expand your reach and help you gain exposure to a broader audience.

While adding your location to your Instagram bio is relatively straightforward, you may encounter some common issues along the way. Here are a few troubleshooting tips:
If your location isn't appearing in your bio after saving the changes, try refreshing your profile by closing the Instagram app and reopening it. Also ensure that your location settings are enabled in your device's privacy settings.
If you're unable to save your updated bio, double-check that you've entered your location information correctly and that you're connected to a stable internet connection. If the issue persists, try logging out and logging back into your Instagram account to resolve any temporary glitches.
By following these simple steps and implementing the tips mentioned, you can effortlessly add your location to your Instagram bio, boost your visibility, and connect with local followers. Embrace the power of location tagging and watch as your Instagram profile becomes a conversation topic.
Instagram Highlights let you pin your best story content to your profile permanently — but most people only know the basic method. In this guide, we cover how to add highlights on Instagram, how to create new ones from scratch, and the workaround that lets you add highlights without posting to your story.

Instagram Highlights are collections of story clips pinned to your profile page, displayed directly below your bio. Unlike regular stories that disappear after 24 hours, Highlights stay visible for as long as you keep them.
Think of them as a virtual storefront. When someone visits your profile, Highlights are the first content they can browse — making them a powerful tool for personal branding and content curation. Each Highlight can be dedicated to a specific theme, product line, or topic, letting you attract like-minded followers or customers who connect with your content.
For businesses, Highlights are especially useful for showcasing testimonials, product demos, FAQs, behind-the-scenes content, and promotions — all without cluttering your main feed.
The standard method for creating Instagram Highlights pulls from your story archive. Here is how to do it:
Your new Highlight will now appear on your profile, right below your bio.
Note: Your stories are automatically saved to your archive by default. If yours aren't showing up, go to Settings > Privacy > Story and make sure "Save story to archive" is turned on.
You can also create a Highlight directly from a story you are currently viewing or have just posted:
This method is great for building Highlights in real time as you post stories throughout the day.
This is the workaround most people don't know about. If you want to add content to your Highlights without it showing up in your live story feed (where your followers would see it for 24 hours), follow these steps:

By using this method, you can keep your story feed clean while still building out your Highlights with the content you want. It is especially useful for businesses that want to add curated content to Highlights without sending notifications or cluttering their followers' story trays.
Pro tip: If the story appears briefly before you delete it, you can also toggle your account to private, post the story, immediately delete it, wait 24 hours, then restore and add to Highlights — then switch back to public. This ensures zero visibility.
Keeping your Highlights fresh and well-organized is important for making a good first impression. Here is how to edit or remove them:
The individual stories inside the Highlight will remain in your archive — only the Highlight collection itself is removed.
Instagram does not offer a built-in reorder feature. However, when you edit a Highlight (even just opening and saving it without changes), it moves to the front of the row. Use this trick to reorder your Highlights by editing them in reverse order of how you want them displayed.
Your Highlight covers are the first thing visitors see. Use custom-designed icons or branded images that clearly represent each category. Consistent cover designs make your profile look polished and professional.
Group your content into clear themes — products, testimonials, tutorials, behind-the-scenes, events. This makes it easier for visitors to find what they are looking for and keeps your profile structured.
Review your Highlights regularly and remove outdated content. A Highlight full of old promotions or expired offers hurts your credibility. Aim to refresh your Highlights at least once per quarter.
Place your most important Highlights first (closest to the left side of your profile). For businesses, this might be a "Start Here" guide, your best testimonials, or your core product showcase. For personal brands, consider leading with your strongest content or most popular series.
Yes. Post the story, delete it immediately, wait 24 hours, restore it from "Recently Deleted," and then add it to a Highlight from your archive. We walk through the full steps above.
Yes. Any photo or video that has been posted as a story and saved to your archive can be added to a Highlight — regardless of when it was originally posted. Just make sure "Save story to archive" is enabled in your settings.
Highlights stay on your profile indefinitely. Unlike stories, they do not expire after 24 hours. You can keep them visible for as long as you want and remove them at any time.
There is no limit to the number of Highlights you can create, and each individual Highlight can hold up to 100 story clips. Once a Highlight reaches 100, the oldest story is removed when a new one is added.
You can see viewer lists for story clips within a Highlight for up to 48 hours after the original story was posted. After that window, viewer data is no longer available — but the content remains in your Highlight.
Instagram Highlights are one of the most underused features on the platform. Whether you are building a brand, growing your Instagram presence, or just want a better-organized profile, taking the time to create and manage your Highlights will pay off every time someone visits your page.

There's no question here—we love advertising with Facebook because the platform continues to provide tools for eCommerce markers to reach an ever-broadening audience.
In 2015, Facebook launched Dynamic Product Ads (DPAs), a way for companies to get their ads in front of people who had visited and/or interacted with their Facebook page or website in the past. In 2017, Facebook expanded on this advertising format by launching Dynamic Ads for Broad Audiences (DABAs). This tool dramatically expands the potential reach of Facebook ads, helping eCommerce businesses improve ad performance.
DABAs expand on the concept of DPAs. However, instead of showing your ad to people who have previously interacted with your company, with DABAs, Facebook expands that audience to those people who have searched for a similar product or service to the ones you offer and/or who have interacted with a company similar to yours.
Obviously, this changes the dynamics of these ads from simply "preaching to the choir" to exposing your product to those who want what you are selling, but haven't yet heard of your company.
When you're not preaching to the choir, your ads can pop-and-lock their way to reach expanded audiences.

DABA campaigns aren't limited to Facebook feeds alone. They can appear on any of the Facebook platforms, including Instagram and Audience Network. They can be single-image ads, carousel ads, and collection ads. In addition, these ads are available across devices, including PCs and laptops, as well as mobile traffic.
With more than 2.5 billion registered users on Facebook and another one billion on Instagram, the potential of this marketing tool is difficult to ignore.
DABA campaigns are a great tool for reaching new customers aka top-of-funnel traffic. This ad tool considers the user's interest, behavior, and demographic data when deciding what ads an individual user will see. This can be beneficial when introducing a new product or a new marketing campaign. You can get your product information in front of potential customers who have already expressed interest (via their actions) in a product like the one you are promoting.
To make the most of your DABA campaigns, we suggest the following Best Practices:
1. Make sure that you write your ad to appeal to new customers. Since the goal of DABAs is to attract new customers to your eCommerce business, you want to write your ad to draw in those people. Don't assume in your ad copy that the reader has any knowledge or preconceived notion of your product or business.
2. Use demographics to fine-tune your audience. While Facebook and its subsidiaries have more than four billion registered users, it's not likely that all of them will have an interest in your product (unless you’re selling pizza—we imagine that’s a pretty universal sell 😋).
For example, are you interested in marketing to customers overseas? If not, you can limit your ad placement to US users. Are you looking to drive business to your local eatery? If so, then you'll want to hone your demographic information even more, so that only people within driving distance of your restaurant see your ad.
3. If you're using product sets, make sure to include a good number of products in each set. Facebook uses AI with DABAs to "learn" about its site visitors' preferences and extrapolate what products might interest them tomorrow...or next week. By including a large number of products in your set, the Facebook algorithm has room to work its magic and match a broader number of potential customers with products.
4. Exclude your current customers. Since you are looking for new customers with your DABA campaign, you want to exclude the people who have purchased from you in the past. We suggest those who purchased in the last 30 days. This function is found under "targeting". You exclude these people because you don't want your numbers to be skewed by people who already know and like your products.
5. Engage in ad testing to see what's working. Ad testing (which is an umbrella term for split tests and lift tests) will show you if you should replace some of your existing prospecting campaigns with DABAs.
Setting up a marketing campaign using DABA isn't difficult. It just takes a few steps. The good news is that you only have to do most of these steps once.
Dynamic Ads for Broader Audiences can dramatically transform your business. However, it does take a little bit of time and effort to set up.
At EmberTribe, we've been optimizing social media advertising like DABAs for our clients for several years and can do the tedious legwork for you so that you can concentrate on what you do best—interact with your customers.
To learn more about using Facebook ads for eCommerce and how to make dynamic ads for broad audiences work for you, book a call now!
Facebook made its recommendation guidelines public, and there is a lot for marketers to unpack. With ongoing pressure on the platform to better manage problematic content, this move represents a significant step toward transparency for businesses and content creators operating on both Facebook and Instagram.
Understanding these guidelines is not optional for brands that rely on organic reach. Content that violates recommendation criteria will not be surfaced to new audiences - effectively limiting your distribution to existing followers only. For growth-focused companies, that distinction can mean the difference between a post reaching 500 people and 50,000.
Before diving into the restrictions, it helps to understand what Facebook recommendations actually are. Recommendation experiences are the platform's algorithmic surfaces that introduce users to content from accounts they do not already follow. These include:
These recommendation surfaces represent some of the most valuable organic real estate on the platform. When your content qualifies for recommendations, it reaches users who are predisposed to engage with your brand - but have not yet discovered you. Losing access to these surfaces significantly limits organic growth potential.
Facebook has organized its recommendation restrictions into five categories. Content in these categories is allowed to remain on the platform but will not be recommended to users who do not already follow the account.
This category targets content that, while not explicitly violating community standards, sits close enough to the line that Facebook does not want to amplify it. Examples include:
The resharing provision is particularly important for brands. Even if your original content is clean, resharing a borderline post from another account can affect your recommendation eligibility.

Facebook applies extra scrutiny to content in categories where misinformation can cause real-world harm:
For brands in the health, wellness, or financial services space, this means your content strategy needs to be built on substantiated claims and educational value rather than hype-driven messaging. Factual, well-sourced content is far more likely to qualify for recommendations than promotional material.
This category is essentially Facebook's war on engagement bait - tactics that generate clicks and interactions but leave users feeling annoyed or deceived:
For marketers accustomed to using contests as a growth lever, this restriction changes the calculus. While contests are still allowed, they will not be amplified through recommendations. That means you need to weigh the value of engagement from existing followers against the loss of potential discovery by new audiences.
Facebook's quality standards target content that does not meet a minimum bar for originality and credibility:
This category reinforces the importance of original content creation. Brands that rely heavily on curating and resharing third-party content may find their recommendation eligibility declining over time. Investing in original thought leadership, proprietary data, and unique perspectives is the more sustainable path to organic reach.
The final category addresses factual accuracy:
For businesses, the practical implication is straightforward: ensure every claim in your social content is accurate and can be substantiated. A single post flagged by fact-checkers can impact your entire page's recommendation eligibility.
The recommendation guidelines create a clear dividing line between content that can grow your audience and content that only reaches people who already follow you. For brands investing in organic social as a growth channel, optimizing for recommendation eligibility is now a core strategic consideration.
Recommendation restrictions do not operate in isolation. Facebook's algorithm evaluates pages holistically, meaning a pattern of posting restricted content can suppress the recommendation eligibility of your entire page - not just individual posts. One borderline post will not destroy your reach, but a consistent pattern will.
This is why regular content audits matter. Review your posting history through the lens of these five categories and remove or archive content that could be flagged. Think of it as maintaining your page's algorithmic credit score.
Brands that have been banned from Instagram Ads or Facebook Ads face additional penalties: their pages will not be recommended at all. This creates a compounding problem where advertising policy violations bleed into organic performance.
For brands running paid campaigns alongside organic content, maintaining clean ad accounts is now doubly important. An ad disapproval issue does not just affect your paid performance - it can throttle your organic growth as well.
Based on these guidelines, here are actionable steps every social media team should implement.
Review your page's content history and align it with Facebook's recommendation criteria. Pay special attention to:
Remove or archive anything that could be pulling down your page's overall recommendation eligibility.
If your brand operates multiple Facebook pages that post identical or near-identical content, deactivate the redundant ones. Facebook's quality signals penalize pages that appear to exist solely to amplify the same content across multiple accounts.
Consolidate your social presence around a single authoritative page with original content.
Pages that have purchased likes, followers, or engagement in the past will not be recommended. If your page has a history of bought followers, consider whether the inflated follower count is actually hurting you more than helping. A page with 10,000 genuine followers will outperform a page with 100,000 purchased followers in the recommendation algorithm.
Follower quality also affects your engagement rate, which is a key input to Facebook's distribution algorithms. Low engagement rates signal to the algorithm that your content is not resonating - further reducing reach.
The common thread across all five restriction categories is that Facebook wants to recommend content that genuinely benefits users. Content that educates, informs, entertains, or inspires will always outperform content designed to manipulate engagement metrics.
Practical ways to create recommendation-eligible content include:
Facebook regularly updates its recommendation guidelines as the platform evolves. What qualifies for recommendations today may not qualify tomorrow, and new surfaces for recommendations are added regularly.
Assign someone on your team to monitor the Facebook Business Help Center and adjust your content strategy as policies change. Proactive adaptation is always less costly than reactive damage control.
These recommendation guidelines reflect a broader shift across all social platforms toward quality-first content distribution. The algorithms that power content recommendations are increasingly sophisticated, and platforms are rewarding authenticity, originality, and user value while penalizing manipulation and low-effort content.
For brands that have always prioritized genuine value creation, these guidelines are not a threat - they are a competitive advantage. As platforms tighten their criteria, brands that cut corners will lose distribution while those that invest in quality will gain it.
The bottom line: align your content strategy with what Facebook's algorithm wants to recommend, and the platform will do the distribution work for you. Fight against it, and you will find yourself paying for every impression.